
Get insights on a Kansas man’s process for 3D printing parts for scale models of early windmills and view his 1/4- to 1/5-scale model windmills.
When Darrin Jantz was a teenager, he occasionally helped his uncle put up windmills near McLouth, Kansas. “I was intrigued by them,” he says. “I kept wondering how they worked and how the gears operated.”
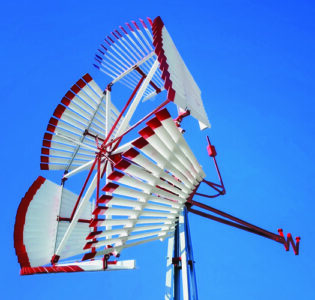
Decades later, windmills continue to captivate Darrin’s imagination. But he’s no longer erecting towers. Today, he’s building scale model windmills using a fleet of 3D printers. His finished projects include 1/5-scale models of a 10-ft. Pipe Raymond (manufactured by Althouse-Wheeler Co., Chicago); an 8-ft. Currie steel mill (manufactured by Currie Windmill Co., Topeka, Kansas; and a 10-ft. Halladay Vaneless (manufactured by U.S. Wind Engine & Pump Co., Batavia, Illinois).
Darrin went ‘old school’ on his first attempt at building a windmill model. “I used a bandsaw and a Dremel tool and tried to carve a Currie windmill out of wood,” he says. “But I could never figure out how to produce the blades.”
Everything changed about three years ago. “The company I was working for had a 3D printer,” he says, “and they said I could use it on weekends.” It was a case of love at first sight. “I was sold,” he says. “All of a sudden, I could create something fairly quickly. Within three or four hours, I can have a piece in my hand.”
Past meets present, in 3D
To design models, Darrin uses Fusion 360, a Computer-Aided Design (CAD) software application for hobby projects. Once he’s satisfied the design is complete and accurate, he creates computer code and sends it to one of his six 3D printers, providing what is essentially a blueprint for production of a physical object – in Darrin’s case, a windmill component.
Because of the limitations of printer size and the available plastics used by the printer for output, Darrin typically works in 1/4- or 1/5-scale. Basically, bigger printers are used to create bigger objects. For his scale models, the smaller scale is a good fit.

As he converts the file for each piece to be printed, Darrin is careful to orient it on the printer based on its eventual structural function. “To gain the greatest strength,” he says, “it may need to be oriented in a specific direction. Otherwise, it might just snap under strain.”
Unlike making a photocopy, 3D printing is not an instantaneous process. One of Darrin’s models has a six-section fan. Each section has 14 blades. Total print time for 84 identical blades is about 30 hours. As a rule, all six printers are running at once. “I usually have multiple jobs going at once,” he says. “With nine models in prototype phase, there’s always something to work on.”
After each part is printed, it is cleaned to remove rough edges. The next step is assembly, to make sure the model functions as designed. Assuming it does, it is completely disassembled, individual pieces are painted and then each is reassembled.
Doing what a windmill should do
In creating scale models, Darrin’s goal is to make his working models as true to the original as possible. When he bought a Pipe Raymond mill to use as a pattern for a scale model, he measured every piece of the full-size mill individually, modelled it on the computer and then converted the file for the printer. “I’m kind of a stickler,” he says.
To that end, Darrin likes to take each model on a test drive, as it were. A light breeze can be hard to find in Kansas, where winds are more typically robust. But in a spring breeze of 6 to 10mph, Darrin got the performance he was hoping for. “We tend to look at the models in a static environment,” he says. “But I like to put them in the wind and see what they will do. I want to see them do what a windmill should do. I think that’s pretty neat.”
Darrin’s Pipe Raymond, a model of a 10-foot windmill (the measurement refers to the width of the windmill’s fan), comes very close to meeting that goal. “When we ran it outside in a light breeze, it tries to shut itself down,” he says. “We don’t have the weights and counterweights just right yet. I’ll probably need to cast the weights.”
Creating a twisted-link chain
One of Darrin’s models features a turntable that rests on 1/4-inch plastic bearings. “If it’s not level, the turntable won’t turn,” he says. “For that, the plastic is too light. I’ve used washers to determine what weight is needed. We’ll try to cast a lead counterweight or add weight to the plastic counterweight.”
Support brackets also present a challenge. “I have to twist the ends,” he explains. “The real ones are threaded but you can’t thread these plastic pieces. When necessary for strength, he uses brass rods instead of plastic, allowing him to thread the ends.

Modelers are accustomed to repurposing objects to serve their small-scale needs. When he needed chain for his Currie windmill, Darrin successfully repurposed a necklace chain. But another project required twisted-link chain and that was impossible to find. He had seen an example of a 3D printed version online, so he tried it. “When you model it, it’s designed so the pieces don’t touch,” he says. “It prints like a stick and you just break the links apart. It’s actually pretty strong.”
Darrin printed another mill’s tail linkage as three individual pieces. “They were printed already linked,” he says. “They are close enough to stick but they don’t actually bond. I did it two or three times before I figured it out. I just kept breaking links.”

To ensure protection from ultraviolet rays, all of the models’ parts have to be painted. “The colors are not necessarily true to what the manufacturers used,” Darrin says, “but you have to understand that there were variations in windmill finishes more than a century ago.” He also makes his own stencils. “Flaws give the model character,” he says. “I was really picky at first, but the more pictures I look at, the more I see flaws on the real mills.”
A glimpse into the past
As a boy, Darrin built plastic models purchased at the local dime store. For years after that, he aspired to create models, especially, he says, “the kind of thing you don’t see every day. I love mechanical parts, and I love seeing how things work together.”

And memories of helping his uncle put up old windmills left their mark. “How does this work?” he’d ask. “How does that work? How do these gears work?” Through research and hands-on experience, he eventually answered many of those questions. But for Darrin, there was more to it than that. He also caught a glimpse into the past.
“Building the models made me go through the thought process the inventors used,” he says. “I’ve gained insights into the thoughts and creative processes of the early inventors. As a model builder, I try to figure out what was intentional. That’s just the way my brain works.” FC
For more information: Darrin Jantz, djantz1981@gmail.com; (785) 393-9513.
Leslie C. McManus is the senior editor of Farm Collector. Contact her at Lmcmanus@ogdenpubs.com.
Originally published in the February 2023 issue of Farm Collector.


