
My son-in-law texted one day and asked if I wanted to fix up another tractor since he knew about the 1952 Case VAC I restored. Being so busy with work and funds a little tough, I said I was not sure, unfortunately. Well, he knows how much I love tractors, so long story short, he made a deal, we made a trade and the 1949 Farmall Super A was mine!
He told me it was his uncle’s tractor. Through the years, it’s seen its fair share of hard work and serious wear and tear. It was used on their farm in West Virginia for 42 years, cutting 6 acres of grass, gardening and plowing. Unfortunately, it sat for about 10 years uncovered with no rain cap or cover on the exhaust. I prayed for the best but prepared for the worst.

So, one weekend, my wife and youngest daughter jumped in the truck with me and we were on our way from Pennsylvania to meet my oldest daughter and my son-in-law to pick up the Super A from his dad’s house in Maryland.
Everything went smoothly. The brakes were free and the clutch wasn’t stuck, so it easily rolled up onto the trailer, a great start to bringing home the poor little tractor. The hour-long drive back to Pennsylvania went great and finally she was at her “forever home.” We proceeded to roll it off the trailer and into the yard, where it sat for a couple weeks until I had a chance to start assessing everything.
Restoration gets underway with mechanical work
First thing I did was pick up a new 6-volt battery to see if I could get the engine unstuck after putting a combination of olive oil and Marvel Mystery Oil in the cylinders. I let it sit and soak for a few days, but no luck: She was frozen solid. I cleared out the 16×30 shed to make space for the little A to start its new lease on life.
I drained the oil and water poured out, which wasn’t surprising, so I dropped the oil pan next. I was surprised to see the crank wasn’t rusted solid, so my guess is when the water filled the pan, it pushed the oil up, obviously, and I feel it covered the crank enough to keep it from rusting.
The bottom of the pistons, wrist pins and top of the rods weren’t as lucky: They were rusted and seized tight. I pulled the valve cover and again, the rust had taken over on the valve train, locking everything up. Pretty quick after pulling the drain plug, I knew a rebuild was a must!
Next, I pulled the head. The #2 and #3 pistons and valves were the worst and in need of serious repair. I had to use a wooden rod and a small sledge to drive the pistons up out of the cylinders, which was not easy. They fought me for every 1/8-inch.
I built a sleeve puller to remove all the sleeves from the block and that went fairly smoothly. I ordered a bunch of goodie boxes from Steiner, including pistons, sleeves, rings, bearings, valves, guides and seals.
Roaring back to life
After cleaning the inside of the block and after cleaning and freshening up the oil pump, I began to rebuild the engine. My youngest daughter joined me during the piston removal and again for the reinstall.

I moved onto the head, which was really bad. After stripping and cleaning, I removed the valve guides to help keep the seat cutter straight when cutting the valve seats. I then proceeded with lapping the valves and reassembly after another cleaning. I tore apart the rocker assembly and cleaned off the rust on every piece. I put everything back together, filled her with oil and for the first time in more than 10 years, she roared to life after just two cranks!
Now that it was running, it was time to strip it down to a bare chassis and start cleaning all the years of rust and grime, replacing seals on the drives and putting in fresh gear oil. I opted to use a wire wheel on a 4-inch grinder as well as a bunch of small wire brushes and scrapers.
Rebuilding the steering box
Once I was happy, I started priming everything with red oxide primer. Then I had to put a lot of focus on the steering because this old girl had a ton of slop. It would turn from 12 to 4 to start going right and 12 to 8 to go left. I completely disassembled the steering box, replaced all the bearings and then did a lot of welding and grinding on the sector shaft to perfectly match it to the steering arm.
This eliminated all side-to-side slop and stopped the arm from moving up and down, further adding to the slop. The steering is tighter than it was when it left the factory in 1949. It was time to reunite the front end back with the chassis and get everything in primer at this point.

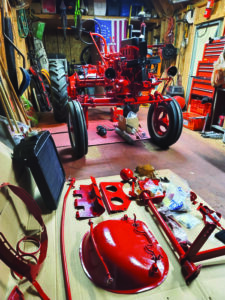
Painting day finally arrived and it was time to start laying down the IH Red. Chassis, steering and engine were all coated. In 24 hours, the second coat went on. Sandblasting each and every little part was tedious, but attention to detail is everything. Numerous parts had to be straightened, welded or repaired in some manner.
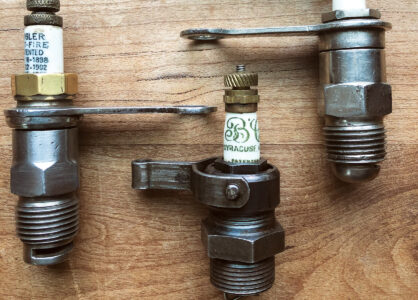
After all parts were sprayed, it was time to rebuild the original H4 magneto and remove the add-on resistor and coil put on once the internals deteriorated. The 6-volt generator was next, then onto the governor for rebuilding. I opted for a completely new factory wiring harness, gauges, starter, switches and fuse holder.
The home stretch
Finally, it was time to start working on the fenders, gas tank, grille and hood. The inside of the gas tank was rusted pretty badly. A pound of BBs, along with Evapo-Rust strapped to a tractor tire spinning for 45 minutes, took care of the problem.
The grille needed a lot of repair, including banging out numerous dents, fixing all the fins, welding the vertical braces, welding the broken spot welds and then fixing a torn-apart lower bolt mounting hole.

Unfortunately, the hood was too twisted and bent out of shape to reuse. My wife, daughters and son-in-law got me a new one for Father’s Day. I was finally ready to start the bodywork, priming and painting. I used I.H. red and I.H. off-white, followed by two coats of clear coat to help it shine.
I moved on to rebuilding the original Zenith carburetor that was borderline salvageable based on the amount of rust inside from holding water for so many years. After all the mechanicals and painting were done, it was time to put on decals.
Given the amount of work I did, I’m sure I missed many small details, but most were covered. She now runs like a sewing machine and looks absolutely stunning! These old tractors are a labor of love and we need to keep preserving these beautiful old machines. Once they are gone, they’re gone. FC
Shawn Barrick lives in York, Pennsylvania, where he restores antique cars, boats and tractors. He restored his first tractor (a 1957 Wheel Horse) at age 11. Check out his YouTube channel: Bourbon, Beer, Tractors and Prepping.


