Few farm jobs give greater satisfaction than tractor plowing a field. Of course, plowing can also be the source of great frustration. Most old-timers know the pitfalls and hazards to be avoided, but for the novice a short primer would be helpful.
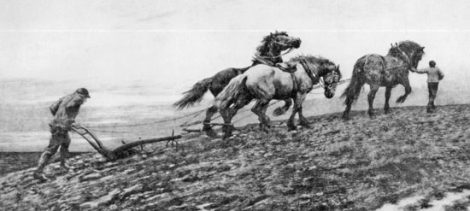
The crude wooden plows that scratched the ground in prehistoric days led to animal-propelled walking plows. The Bible has much to say about plowing, including the scorning of the “sluggard who won’t plow in the fall because of the cold” (Proverbs 20:4). Plowing with these hand devices was arduous and anything but joyful. Raised on a farm, Henry Ford said, “I have walked many a weary mile behind a plow and I know the drudgery of it.”
James Oliver, inventor of the Oliver Chilled Plow, said, “The man who has never been jerked up astride his plow handles, or been flung into the furrow by a balky plow, has never had his vocabulary tested.” Wheeled riding (sulky) plows were invented in 1870, but hand plowing was still the norm until it was supplanted by the inexpensive lightweight tractor and its corresponding plow.
Key to good farming
Why plow at all? It is true that modern no-till farming techniques have lessened the need for routine spring and fall plowing, and the field cultivator has replaced the moldboard plow in many cases. Further, the use of chemical weed killers leaves fields relatively clean of last season’s residue. But when a thickly sodded piece of ground is to be made into a seedbed, the plow is the tool with which to start.
The plow’s purpose is to pulverize (or break up) the soil, admitting air and light, two essentials to normal plant growth. The plow inverts the sod and covers trash (such as corn stalks) and manure, mixing it with the soil to decay and furnish plant food.
The plowed soil must have good contact with the subsoil to facilitate the rise of moisture. Voids and clods of trash or sod impede root growth and break contact with the subsoil. As a 1930s John Deere Power Farming brochure states, “No matter how carefully you carry on subsequent tillage operations, you can’t correct the mistakes of poor plowing. Good plowing and good farming go hand in hand.”
First, some terms and definitions are in order:
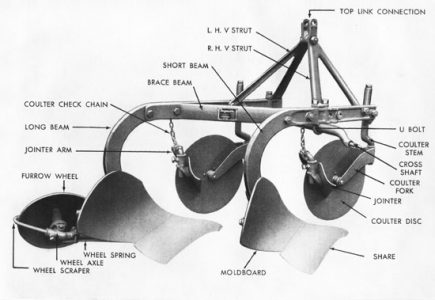
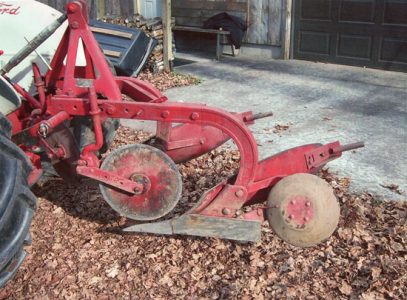
Plow: There are many devices called plows (or ploughs), including snowplows. The subject of this article is the moldboard field plow. The two main types are trailer plows and mounted plows. The main parts of both are the bottoms, coulters, jointers, furrow wheels (or rolling landsides) and beams. The bottoms consist of the moldboard, share, frog and landside, and in some cases, a replaceable shin.
These parts are identified in this image, except for the frog and shin. The frog is a steel piece that holds the landside and moldboard together and also supports the share. Multiple-bottom plows use sliding landsides on the rear bottom only. Certain types of chilled-iron plows have a replaceable shin that serves as the leading edge of the moldboard. This surface gets the hardest wear and can be replaced when dull.
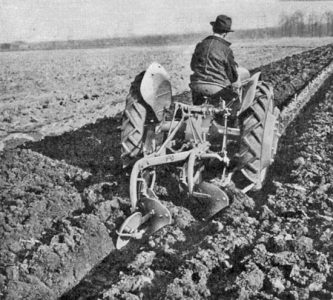
Plows are available with one bottom or as many as 20. The smallest is generally a 12-inch bottom (indicating the width of the cut), but 14-, 16- and 18-inch plows are common. With a 2-bottom, 14-inch plow, an area 28 inches wide is plowed on each pass. Plows generally roll the soil to the right, although two-way plows have alternate bottoms that turn the soil either right or left.
Both trailer and mounted plows can be mechanically raised and lowered, or operated hydraulically. Mechanical trailers come with a “trip rope” that either drops the plows to start plowing, or raises the plows (through power from the plow wheels) at the end of the furrow.
Hydraulic mounted plows are generally based on 3-point hitch patents by Harry Ferguson first used in the U.S. on the 1939 Ford-Ferguson 9N tractor. These have automatic draft compensation known as “draft control.” Draft control automatically raises the plow as necessary when hard going is encountered, thus preventing the tractor from stalling. The system then returns the plow to its original depth when the hard ground is passed.

Suction: Both the landside and the share are made with a slight amount of concave curvature. This creates suction that pulls the plow down into the soil and also holds the landside tightly against the furrow wall. Wear reduces suction; eventually, these parts must be replaced.
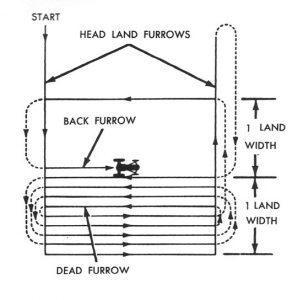
Land: The section of a field to be plowed is called a land. The ends and sides of the land are called the headlands. A large field may be divided into several lands, to be plowed separately for economic reasons.
Furrow: The open ditch left by the rear-most bottom as the plow progresses through the land is called a furrow. A dead furrow results when neighboring furrows are plowed in opposite directions, throwing the soil away from each other (or the open furrow left at the edge of the field). A back furrow is the opposite, when the opposing furrows fold together.
Getting ready to plow
Hopefully, you have an owner’s manual available for your plow. If not, general guides on John Deere, International Harvester and Ford are available online. If a plow has been doing satisfactory work, it is probably best not to adjust anything, except to check the coulter settings. They should be set 3/4 of an inch above the nearest point on the share. They should be set to the left of the landside, just enough to leave a clean-cut furrow wall.
For mounted plows, make sure the coulter check chains will not allow the coulters to hit the tractor tires. For trailer plows, the tractor drawbar must be adjusted so that the right wheel of a trailer plow runs about 2 inches away from the furrow wall. If allowed to pull over to the wall, the front plow will have 2 inches less of a cut than the rear plow.
Laying out the field
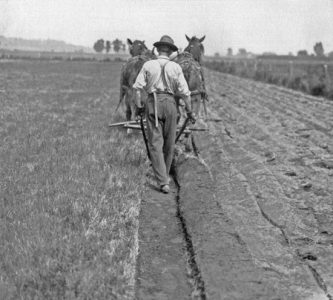
Straight, even furrows are the mark of a good plowman. This was especially evident with hand plowing, and much easier done with a tractor plowing outfit, but it is still a job in which the workman can take great pride. It is usually best to pace off the area to be plowed, set stakes to indicate individual lands, the center of each land, and where to start the headlands. Leave enough room in the headlands to turn the outfit for the next pass. Much more room will be needed for a trailer plow. Headlands can be finished after plowing the lands.
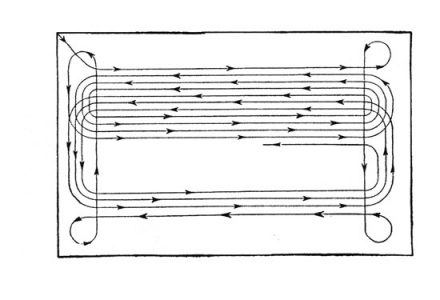
Images 6 and 7 show two optional plowing patterns. Image 7 works best with mounted plows, since tight turns are required in the center of the lands. For trailer plows, the pattern of image 6 allows breaking off from finishing land one to start on the next, and so on with subsequent lands. However it is likely that a tight turn will be required to finish the last land. Thus, more headland room is required with this method.
First plow the headland furrow with the plow tilted to the left (assuming a 2-bottom plow), leaving ample room to make the turns. Headland furrows should be turned toward the land to be plowed. These furrows will make it easier for the plow to penetrate at the start and to make an even finish at the end.
Opening a land
Again, with the 2-bottom plow tilted to the left, lower the plow into the soil at the headland furrow. Drive toward the stake, or other marker at the opposite end of the land. This is where careful layout pays off. Rather than picking out a tree to head for at the far end of the field, use stakes or other good markers. It has been said that novice plowmen have used a neighbor’s cow for a marker only to have the cow wander off.
As the front plow reaches the headland furrow, pull up the plows while the rig is still moving toward the stake. Turn around according to the diagram and adjust the plows as necessary so they will be level when the rig has its right wheels in the furrow. As the first bottom hits the headland furrow, drop the plows. On very small plots, it may be preferable to start on the right side of the land and simply circle around and keep plowing in the same direction for each pass. With mounted plows, backing up with the plows raised and then moving to the left for the next pass might be most convenient. Either way, this method leaves neither a dead or back furrow in the middle of the land, but it is not economical on larger plots.
Finishing a land
Plow back and forth until the lands are completed. When completing the last land and the unfinished strip is narrower than the tractor tread, drive with the left tractor wheel in the last furrow. This will probably leave another narrow strip to be finished on the return trip with the right wheel in the last furrow. Re-level the plows as needed. Finish the field by plowing along the headland furrows. Remember, you are throwing the dirt to the right and moving to the left for the next pass. This may require circling around to do the final furrows. Repeat as necessary until the headlands are plowed. Then, step back and admire your work!
Preparing the seedbed
Discing and harrowing are required to make the field ready for planting. The disc cuts up and levels the furrow humps left by the plow. A spike-tooth or spring-tooth harrow may be used to break up any sod clods left in the field.
Maintenance key to equipment life
Store the plow with the shares off the ground. All ground-engaging surfaces should be covered with axle grease or similar rust preventative. Coulter and rolling landside bearings should be greased with a pressure gun. Check for damage and for dulling of the coulters or shares. Replace as necessary to be ready for the next plowing. FC
After 36 years in the aircraft industry, Bob Pripps returned to his first love and began writing about tractors. He has authored some 30 books on the subject and several magazine articles. Pripps has a maple syrup farm near Park Falls, Wisconsin. In harvesting the maple sap, he relies on a Ford Jubilee and a Massey Ferguson 85.


