
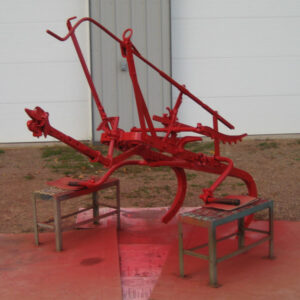
I had restored tractors before but didn’t realize I was in for an education when it came to fixing up an Oliver Plowmaster 100.
My father had a two-bottom 12-inch Plowmaster 100 that had been waiting around to be repainted. His plow was missing some of the latch mechanism to allow the rooster comb lift to function properly. I thought a two bottom 16-inch might be easier to get wear components for and would fit better behind a restored Oliver 77. Therefore, I searched the internet for a two bottom 16-inch plow with the complete lift mechanism.
Luckily, I found a plow in Iowa. Just a father and son day trip from Wisconsin and I had it back home.
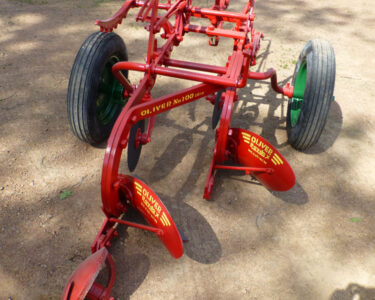
I proceeded to make a clone combining parts from both plows to make the plow I wanted. The hitch, rubber tire wheels, and fixed tail wheel from the 12-inch plow were attached to the 16-inch plow.
The education started when I started disassembling the wear components. I had prepared myself for the project by buying a set of 8-point sockets. Everything was rusted. I had to use a nut breaker on almost every nut.
The moldboards were NC225-16″M which I found out had remained in production a long time but were recently discontinued. Considering the moldboards weren’t worn but were pitted in some areas, I decided to fill the pits with JB weld and sand smooth. The mold board was then covered with EZ Slide graphite coating.
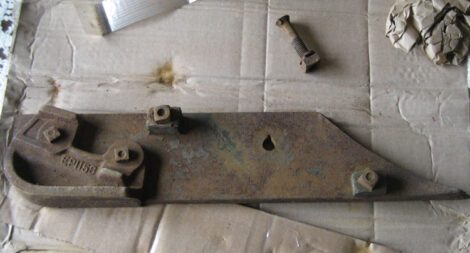
The shins needed to be replaced. I ordered a set of shins that were the same part number; however, when they arrived, they were a different shape and had standard plow boltholes rather than the key holes of the original shins. After some searching, I found a set of shins the correct shape with the original key holes for bolts.
The moldboard and shins needed new 3/8-inch keyhole bolts to be reassembled. The only place I could find bolts was from Case New Holland. The only way to buy the bolts was by the case. This was expensive to say the least.
The landsides and heels also needed to be replaced. I was able to find one NOS landside complete with heel and matching keyhole bolts. The second landside containing the mount for tail wheel, I had to make. I bought a piece of 1045 cold rolled steel and drilled and countersank the holes for standard plow bolts. The front of the landside was ground to match the moldboard and share.
I was able to find a second NOS heel for the second bottom. The coulter posts were all welded up. I was able to find a set of NOS coulter posts, but they were once again, expensive.
After talking to an older Oliver dealer, I got confirmation that the wear components were updated several times over the years. The part number stayed the same, but the shape changed as time went on. I don’t know what kind of an engineering department makes parts that won’t retrofit without changing the part number. Anyway, the dealer was able to sell me a set of shares, but they needed to be cut off with a cut off wheel to match the new landsides.
Luckily, dad had already found a set of good used coulters he had picked up with the intension of putting them on the 12-inch plow.
While disassembling the tail wheel I didn’t know how it was made, so I used an impact to remove the nut on the spindle. The spindle is an enclosed carriage bolt that when impacted caused the square shoulder of the bolt to break the casting it fit into. I was also able to find that casting as NOS and have it replaced.
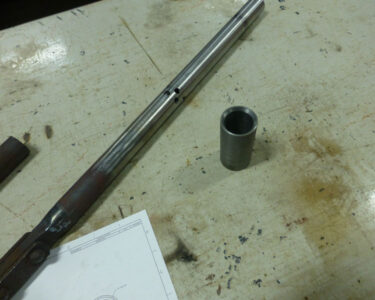
While cleaning the crank, the balls were rusted so small they fell out when cranked.
The collar that traps the balls was heated and driven off, but not without damaging the tube, that holds the balls. A section of tube had to be machined on a lathe and drilled at the same pitch as the ball screw then welded to the original tube.
When inspecting the collar, it was determined that the balls had worn dimples on the inside. A replacement collar had to be machined that could be heated for reassembly and cooled to a tight fit on the tube.
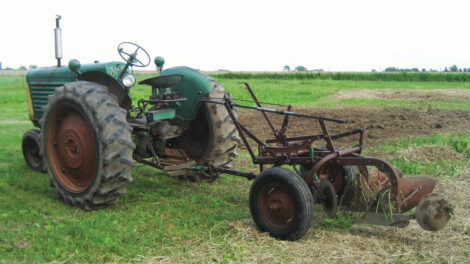
With everything repaired on the plow, I hooked it to an Oliver 88 and took it out to plow a pasture. The plow is a unique plowing experience. The tail wheel lifts up in the air similar to a 3-point mounted plow, but it pivots at the drawbar rather than sticking out rigidly. The relatively smooth tread tires didn’t have any trouble getting traction to lift the plow out of the ground. The JB weld in the pits of the mold boards held up fine.
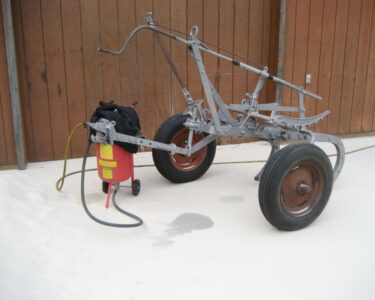
Sandblasting and wire brushing to prepare for paint went relatively uneventfully.
With the plow painted red it was time to start the graphics. Decals were not available for the size moldboards I had, so stencils had to be made. I had taken photos prior to disassembly. I used these photos in addition to photos I took of an original plow at a gas and steam show years earlier to scale to size and print stencils on paper card stock.
The plow was reassembled with green wheels and a set of Firestone tires.
When I started this project, I had no idea all the trouble I would have working on it. Taking pride in the final product almost makes it all worthwhile. FC


